Bringing your RPG Maker MV creation to Android devices can be a rewarding yet complex process. With the right approach and tools, you can transform your game into a mobile-friendly app compatible with most Android smartphones and tablets. This guide walks you through the entire deployment journey, from preparing your game files to customizing your app before publishing it on the Google Play Store. Whether you’re a seasoned developer or just starting out, understanding each step helps streamline the process and avoid common pitfalls.
Preparing Your Game Files for Android Deployment
The initial phase involves exporting your RPG Maker MV project and setting up the necessary files for Android compatibility.
- Export Your Game: Navigate to the Deployment menu within RPG Maker MV and select Android. This will generate the essential folder structure containing your game files.
- Optimize Your Files: When exporting, enable the option to Exclude unused files. This step reduces the overall size of your game, making it more suitable for mobile devices and improving load times.
- Organize Folder Structure: Ensure that the exported files are well-organized, with the ‘www’ folder containing your game’s assets and scripts. You will later import this into Android Studio.
Creating the APK Using Android Studio
Once your game files are ready, the next step is to compile them into an APK, the Android application package format.
- Install Android Studio: If you haven’t already, download and install Android Studio from https://developer.android.com/studio/. This is the official IDE for Android development and provides all necessary tools.
- Download the RPG Maker MV Android Client: Obtain the official MV Android Client from the RPGMV website, ensuring you select the “Download Source” link for full project files.
- Open Android Studio and Import the Project: Launch Android Studio, then choose Open existing Android Studio Project. Select the folder containing the MV Android Client files.
- Import Your Game Assets: Within Android Studio, right-click the app folder, navigate to New > Folder > Assets folder, then copy your exported ‘www’ folder into this assets directory. This allows your game content to be bundled with the app.
- Configure App Identifiers and Versioning: Open the `build.gradle` file under the Gradle Scripts folder. Change the `applicationId` to a unique package name (e.g., `com.yourname.yourgame`). Adjust `versionCode` (increment for each update) and `versionName` (for display purposes). After modifications, sync your project with Gradle.
- Rename the APK: Open `AndroidManifest.xml` in the manifests folder and set the `android:label` attribute to your game’s title. This will be the name displayed on the device’s home screen.
Customizing Your Android Application Package
Personalizing your game’s appearance and settings enhances user experience and branding.
- Change the App Icon: Use Android Asset Studio to generate custom icons. Save your icons as `app_icon.png`, then replace the existing icons in `res > mipmap` folders accordingly. For round icons, ensure you select the appropriate shape option.
- Adjust Visual Elements: Modify other resources such as splash screens or background images by replacing files in the `res` directory.
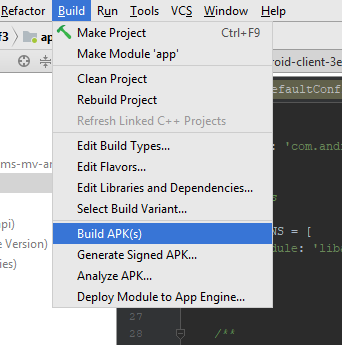
- Build Your APK: Once customization is complete, select Build > Build APK(s) from the top menu. Android Studio will compile your project into an APK file, ready for testing or distribution.
- Test Your APK: Install the APK on your device to verify functionality. You may need to enable “Unknown Sources” in your device settings to install apps outside the Play Store.
Tips for Successful Deployment
- Optimize for Size: Always tick the Exclude unused files option during export to keep your APK lightweight.
- Use Proper Signatures: For publishing on Google Play, sign your APK with a proper keystore. Refer to Android’s official signing documentation for detailed instructions.
- Consider App Store Limitations: The Google Play Store limits APK sizes to 100MB. If your game exceeds this, explore APK Expansion Files to upload additional data.
- Legal and Privacy Compliance: Ensure your game complies with Google Play policies, including privacy and content guidelines.
Additional Resources and Support
- To learn more about the process of starting a game development business, check this comprehensive business setup guide.
- For insights into unlocking hidden game content and secret characters, explore strategies in secret character acquisition.
- To improve your chances of landing a job in game development, review this detailed career advice resource.
Following these steps ensures a smooth transition from your RPG Maker MV project to a fully functional Android app. With patience and attention to detail, you can share your game with a global audience on mobile platforms.